Tuesday, June 5, 2018

Wood Working: Creating More Stools [MakerID-5]

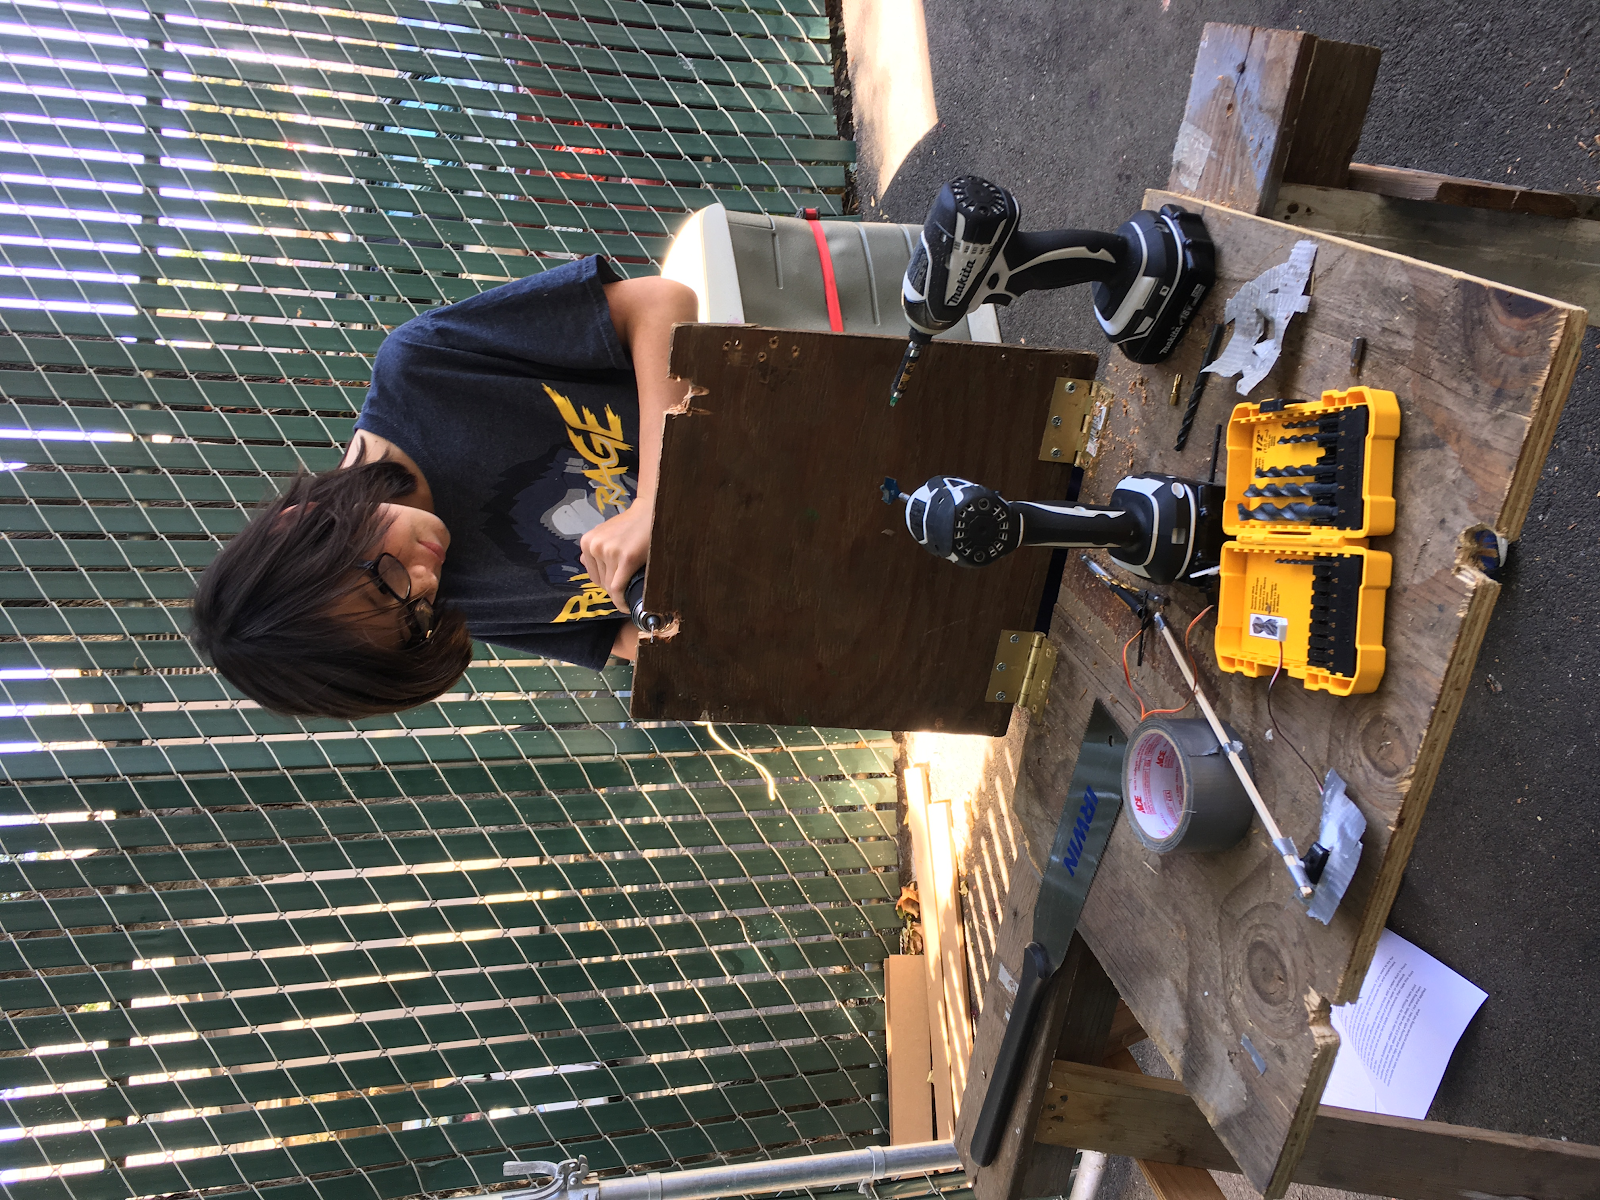
Our project is wood working. We are building a stool for our yard. We wanted to have more seating for all of our friends when we are hanging out. Our inspiration to build a stool was because at recess and lunch we always sit on a bench with all of our friends, but there is never enough space for all of us. So we thought if we built an extra seat then it could be easier to seat all of our friends.

Before we started the woodworking we went around the school looking at stools other people had made. We decided which one we liked the best and then modify it to be better.

During the time we built our project we learned how to use a screwdriver correctly and how long it takes to saw. Overall we learned how long and hard the mechanics are, and how wood working with not a lot of tools is difficult.

One challenge we faced was lack of materials. So we decided to find some for yourself. We found a bunch of wood that was not being used and decided to cut it. We kept persevering even though we didn’t have any teacher help or experience with wood working.

Our estimated cost of the project is $0 because we used materials that the school already had.

Our bench is on the left. We based it on the one on the right.


Laser Cut Sushi [MakerID-18]


Our Maker Faire: Laser Cut Sushi

The goal for our project was to create laser cut patterns on seaweed. We wanted to make sushi more accessible to picky kids by making the appearance appealing. We were inspired by this post: https://makezine.com/projects/laser-cut-sushi/. We thought the idea of laser cutting seaweed was creative, fun, and achievable. Some people may think sushi is weird or gross, but we think that if they see it in a new light, they might find sushi as delicious as we do.

Cutting the Seaweed

The ‘new light’ we tried was making the seaweed look fancy. We designed our pattern for the seaweed using Adobe Illustrator. It was slightly confusing at first, but after a few minutes we got the hang of it. To use the laser cutter, we needed to watch a video and pass a test, which we managed to finish early on. Then, we were free to design and cut!

Designing one test pattern on Adobe Illustrator.
Our finished product

Here is a video of the process:


At one point during the printing process of our test pieces, something went wrong. Instead of cutting the design, the laser cutter shuffled back and forth rapidly, like a small excited dog. After a few seconds, we turned it off and asked for help. We learned our mistake was because of a technical error, and after a test, we were back on track.


Making the Sushi

We decided to test our seaweed and make some sushi before the Maker Faire. To make it, you lay out a piece of seaweed, spread rice over it with a paddle, place your desired fillings in the middle, and wrap it up! The holes in the seaweed didn’t end up being a problem at all, thankfully. Below are some pictures of our attempts:


Conclusion

We learned a lot from this Maker Faire project. For instance, in the beginning, we had little idea what the laser cutter was, or how to use Adobe Illustrator. Now, a mere fortnight later, we have created three different patterns and cut many sheets of seaweed.

Of course, if we had more time, there are things we would like to do. The patterns we have now are simple, based on geometrical shapes. If we had more time, we would like to make more complex designs, maybe inspired by nature.

If other groups were looking to try this project, or something like it, some advice we would give is to be prepared ahead of time for the day of the Faire and test the seaweed to make sure it works.

This project is great because other than ingredients, it doesn’t cost anything. Because of the laser cutter in the science room, we didn’t need any outside materials. We bought the rice, vegetables, seaweed, and other toppings ourselves, and brought dishes from home.

Enjoy!

Phoebe and Sarinah

Bubble Machine [MakerID-10]


For our school maker faire we decided to construct a giant-bubble blowing machine. We decided on this project out of other suggestions because we looked through its assembly instructions and found that it involved skills that we wanted to learn more about, such as woodworking and programming.

We started out with the frame. We bought an old broken half  sawhorse from a hardware store then set about the task of removing unnecessary pieces and making it overall sturdier and less dangerous by replacing old nails with new ones. After completing the renovations, we nailed an additional wooden platform to the side and used hinges to allow it to swing out. Our framework was complete. We moved on to the process of sawing two large notches into the side of the swinging platform, and inserted servos, each with a long dowel attached. That’s as far as we’ve gotten so far, but we plan to soon add the fan to blow the bubble mixture, and string the dowels together to pick up bubble mixture. 

One of the numerous obstacles along the way of our maker faire experience was the non-immediate availability of certain materials necessary to our project. We were able to overcome this difficulty by working with what we had while we waited for the materials, than adding them once they had finally arrived, as well as buying some of the materials ourselves.

If you were to make this yourself, you would need about $150 in supplies, and about a week of intense work, and many tools such as saws, drills, solder and more. If you want to make it the instructions are at this site: makezine


Monday, June 4, 2018

Dungeøn

My maker faire project is a simple 2D retro styled game that plays like a basic RPG would be expected to, but with a catch. First of all, and unimportantly, all the enemies are skeletons. Second of all, you are unable to use melee, ranged, or magic. You must plant bombs strategically to eradicate the skeleton infested dungeons.


The reason why I chose to make a game is because I often don’t find enough motivation to finish a game entirely. No matter how loved it is by a community, I will (99.9% of the time) never finish it. Another thing i’ll do when I make my games is I’ll use free use sprites from online, so I don’t have to make them my own. For this project, the only thing that wasn’t created by me, was the music (I thought about making music for it, but it would be a maker faire project by itself).

The biggest challenge I had would probably be using my own ideas for almost everything. It’s great to have inspiration when you make something, but you don’t want to make an identical copy of the original (unless that was your plan). I came up with a skull sprite that had cross stitched styled teeth and then did the body, which I made significantly out of proportion to give it an art style that most pixel games wouldn’t use.

I learned that, when I dig down and think of some ideas, I can actually make a fairly decent product. If I had more time, I would compose the music and make some simple lighting effects.

I’d say what kept me motivated through ebbs in my project, was people at the school who were interested in the game, because I had people asking what I added, if they could see it, and if I had finished the Boss/New enemy/Textures. I had a group of people who wanted to see the final product, which motivated me to complete it.

The cost of the project was $0. Yup, it didn’t cost a single penny to make. Everything in it was free to make, and free to use (as long as you give credit to the original creator, me)
(Online) Project: Dungeøn - Main Quest ❖

Making a Duct Tape Apron [MakerID-29]

My project was creating a duct tape apron to protect the clothing of students when holding the BPC chickens. since it is duct tape, it protects the legs of students from getting scratched. As duct tape is a durable material, it will last for a long time and can be kept outside. It is also waterproof and easily washable, so if the chicken poops, the clothing and skin of the person holding the chicken will be protected, and the apron can be easily removed and washed.

My inspiration for this project was seeing how hesitant the other students at the school were of holding the chickens after a few students were pooped on. I also really enjoy making things out of duct tape, and making duct tape clothing was another idea I had. This project both solved a problem and was super fun to make!


I constructed this apron solely out of duct tape and a few small metal objects. First, I made a weighted strip of duct tape, with the nuts I used wrapped inside. Then, I made two equal strips of duct tape and then filled in between them. I covered the other side of the duct tape so it wasn't sticky, and then created a waistband that is adjustable. Then, I wove folded over strips of tape to create the torso section and attached it to the leg section. Then I added the overlapping straps and realized the waistband I already had would not accommodate the egg pockets. I started to create another one, but didn't have time to finish it. If I had more time, I would have finished this and the pockets, and lined them with some soft fabric to protect the eggs from breaking. As it is, it only has one use, but that is alright.
One problem I encountered when creating my apron was the fact that duct tape sticks to itself. A lot. It happens to be quite difficult to work with something that sticks to everything. It meant that some parts of the apron are rough and somewhat unattractive. I worked around this by making the duct tape equivalent of a loom, so the tape was taught enough not to bunch up or attach to other pieces. This helped make the apron even and not as lopsided. I learned that duct tape is a difficult medium that is very versatile and useful. I hope to make more aprons in the future (if I have time) so more than one person can wear them at the same time.
This project will take some time and patience because a lot of duct tape gets ruined in the process. However, this project is very cheap- only about $5 for one roll of duct tape (more than enough).

Lost & Found Solutions [MakerID-25]

At BPC, as much as the school is otherwise always clean and nice, the lost and found was dirty, and smelled terrible. It was impossible to find anything because all the clothes were piled on top of each other and no one wanted to look in it. For our Maker Faire project, we wanted to clean and reorganize the lost and found so that it would be more accessible for students and faculty.

Our inspiration was just the fact that making the lost and found cleaner and more accessible would help all the students in looking for their stuff. We ourselves were always intimidated to even look in the lost and found, so many people never got around to finding their clothes, let alone having all the effort to go digging through other people's clothes as well that have been there for weeks and probably months.

In order to clean up the lost and found, first we put out all the clothes in the yard so kids could take their jackets. We were really excited because we even had a friend that got three jackets that they had lost! So we got rid of as many clothes as we could, then measured the length of the top so we could install a PVC pipe to use as a hanger for clothes instead of just piling on the clothes. We did this by drilling a half circle into the sides of the ledge on the top inside of the shed.

We also installed a piece of wood near the bottom fourth of the shed to separate the clothes from the papers and water bottles, small things like that. We had trouble with this because we first measured the width incorrectly and had to re-cut the wood, but in this process, we learned how to use a jigsaw which was super cool.

We learned a lot of interesting things in the process of our project. We learned about drilling and sawing into different types of materials. As well as learning that if the clothes are all put out, kids are way more likely to collect all their stuff. If we had more time, then we wouldn’t have been as rushed and possibly had more time to explore different ways to modify the lost and found. We could have possibly built another small shelf next to the lost and found small things if we had more time. For anyone else in the future who is taking on the task of re-organizing their lost and found, make sure to get all the measurements right before you do any cutting it really helps.


Our project was completely free for us because we used resources that we already had at BPC.
How to use a jigsaw video

Cardboard Air Hockey Table [MakerID-28]


Cardboard Air Hockey Table
by Tyler, Henri, Rocco


The team clearly working on the air hockey table

Our  Maker Fair project is to create a working Air Hockey table that doesn’t cost anything but the materials in the science room, but still functions well enough to play.
Our inspiration came from an idea. We wanted to make a game, but not make a full blown game, like maybe just an air hockey table. But not a full blown air hockey table either. We just wanted to make a functional air hockey table that wouldn’t require too many materials
In our first process of deciding what our team was gonna build, we were deciding between an air hockey table, a Rube Goldberg, and a guitar. Henri and I didn’t like guitar, and Rocco didn’t like Rube Goldberg machine, so we decided on an air hockey table. We started working immediately. The first thing we did was we made a cardboard prototype about one foot wide and two feet long. We poked holes in the cardboard with nails to let the air through. We put a fan under it and held down the cardboard. We created a test foam puck to see if it would move easily against the cardboard’s surface with the air on and it did.. Our finished project will most likely be 2 fans long (the big square ones stored in the upper science room) give or take a couple of inches.
We encountered a problem with the fan. When the fan is lying down on a table or a floor, less air gets sucked in and the fan gets less air to blow into the air hockey table, which alters gameplay majorly!
The things we had to work around  were the materials. We learned how to problem solve and to find  these work arounds for materials we did not have like using fans from the 6th grade science class. Also, we did not have slippy-slidey materials, so we had to improvise on our own with cardboard (it actually worked surprisingly!)
Thing we would like to do in the future with this project if we had more time would be the fact that we would want to make it more legit. Our team can all agree that we would want to make it bigger, and use materials that would make it feel like more of an air hockey table. Not just a cardboard one..

For anybody who also want to do this, this is our advice to you : This is fun, you should do it! But make sure you plan it out before you start. This is a good project to do, because the materials are easy to gather, because you can find them in your house (most likely!) The only materials we needed were 2 fans and cardboard, which pretty much equaled up to 0 dollars spent!

Spinning Lantern [MakerID-23]

My project is making a spinning lamp so I can learn how to make different objects  while reinforcing old skills. My inspiration for this project was 1) that I really wanted to go over my comfort zone with a project while keeping it in reason and reinforcing old skills  and 2) it has a Japanese backstory.

I engaged in the picking process because I am the only one in my group. I made sure my idea worked with Ms. Mytko before I started.

My main problem was that I had cut the bottle incorrectly leading to the cardboard not fitting correctly on the top. I had two versions of the vent but I unfortunately couldn’t use  them because they kept on falling off the bottle. I learned that cutting everything precisely will totally change the effect of the end project. If I had more time I would probably make  it a little bit more complicated but I would first make a precise model before anything else.

If anyone else wanted to do this project I would suggest that they would get the materials and then get started instead of doing the project without the items. For my project I spent a total price of $21.20ish. How To Make a Spinning lamp


Magnetic levitation air plant [MakerID-19]

                    MAGLEV AIRPLANT


For my Maker Project, I built a Floating house plant planter. I had the idea for my project when I was looking for Maker projects on Makezine.com, and i happened to stumble upon this project, which I thought was really cool.  The idea of this project was to make a houseplant that floats in a can several inches above a spraypainted cigar box. For the plant, I’m using a common airplant, tillandsia caput-medusae

One of the major problems I encountered was finding materials online that would arrive on time, when I needed them. I really just had to put more effort into it than usual, and I sorted the problem pretty easily. I didn’t have too much trouble working within the constraint of a 100$ budget, though. My entire project cost around $80-$85. During the process of making and preparing for this project, I learned that procrastinating gets you nowhere and that the only way to get work done is sitting down and getting to work. If I had more time to do this project, I would have made a few more and sold them. If I were to give any advice to anyone trying to recreate this project, I’d say to be careful not to drill a hole in your hand on accident. 

Link to project on makezine.com: Link
Image result for maglev air plant

Dog-Face Pillows [MakerID-31]

For our Maker Faire, we are doing Dog-Faced Pillows. We decided to make this because we want to make comfortable pillows that make you feel warm and at home no matter where you are.

We were inspired because Nadia has a dog Chai, and whenever she travels and her family didn’t take her dog, she missed her dog. We saw a pillow online and thought it would be perfect. She is also going to Poland without her dog and will miss her dogs birthday which she is sad about. We thought that everyone could use a dog pillow whether they have a dog or not. Many people love dogs, but have families that can't have dogs or that are allergic. If so, this is perfect for you! You can cuddle with our pillow whenever you want and put wheels on it and take it for a walk.

We started by using a photoshop app and making a model of her dog (Not clear enough when she tried to take a photo of Chai).

One issue we had with this was that we didn't have a lot of time to make this. We decided on this project because we wanted to master photoshop and have the knowledge of knowing which apps are good in case we needed to photoshop in the future. Although we are very busy after school, we took time during car rides and such to design our pillows. We tried countless times until we got one we liked. During the process we learned that the apps Background Eraser, Phonto, Adobe draw, and Picsart are very easy apps to use for photoshop. We also learned how to sew and do an iron on transfer.

If we had more time we would master photoshop and be able to do it fast and well and we would’ve made more pillows. This project costs about $25 if you don't count a sewing machine. We hope you enjoy are pillows! Remember, we will make more and sell them at Macy’s! :)


3D Printer [MakerID-17]

DIY 3D printer Blog post 🖨


This year for the Maker Faire we decided to finish up our DIY 3D printer. We started this project in
the beginning of the school year. However, since most of the parts are from China, they took a long
time to arrive. The parts only started arriving a few weeks ago, but with the upcoming Maker Faire,
we decided we would still  try to finish it up to use as our project.


We decided to make this 3D printer because we thought it would teach us more about 3D printing
and how it works. If this 3D printer works, we plan on making another one but this time we would
probably get the parts from the US and we would also buy the aluminum extrusions precut because
it was pretty hard to cut them by hand. The printer we are making is called the


Hypercube by Tech2C


More information about it can be found here.


One of the challenges we faced was the lack of instructions, so we had to build it by only looking at
the pictures.


Top: 3D printer electronics
Bottom: 3D printer we modeled off of

Cost ~$200

Desktop Foundry [MakerID-6]


Our finished foundry, and its product, a small heart.


Desktop Foundry

                     Julian Rhoads and Sara Hartman


Our project was a desktop metal foundry. We had both wanted to work with metal, and make figurines using metal, and Ms. Mytko showed us this article on MakeZine so we decided to make the little metal foundry. Our objective was to build a working foundry that melted field’s metal. (Field’s metal melts at 144 , so it would melt under an open alcohol burner.) All in all, I think we succeeded. In the article we were using, it said to use many pieces that included dowels. The dowels we had in the classroom were either too short or too thin. We had to really engage ourselves with this problem, because we thought that we couldn’t use these dowels. We decided that  instead of ordering more, we would use the ones we had. We glued two of the short dowels together. They were actually some form of clothespin, but we thought they might work. When we put them up, we thought that it wouldn’t hold, but it did! I think that it’s one of the best parts of our project. We encountered some difficulties along the way, and we thought that we weren’t going to finish on time. For example, acquiring the wood for the base. The article said that they used 2” by 2” wood, so we decided to double that to 4” by 4”. Later in the article it said 7” by 7” base, so we were pretty confused by the dimensions. We needed a larger piece of wood than the one we had cut, so we improvised and went with an old piece of wood a different make faire project had used. I think what we learned from this project was how to improvise. We used the materials we had, and learned to make changes as we went along. Our goal wasn’t necessarily to make it look pretty, it was to make it functional. But, if you have the time, you can make it pretty. That’s what we would’ve done if we’d had more time. Just a hint for people trying to do this project, don’t look for the exact parts in the article. The materials on the article are rather specific, and they don’t need to be. We used clothespins instead of dowels and they worked fine. So don’t get too caught up in the materials list. Cost can be a problem however. Because we used materials we already had, we didn’t spend much money, but if you were to buy everything online or at an art store, it would be about $61. The alcohol burner alone costs around $17, but Ms. Mytko had one in her room, so the only thing we needed to buy was a small vial of field’s metal. Field's metal happens to be quite expensive. The small vial was $30 in itself. If you wanted to make a desktop foundry, you could probably find substitutes for the actual materials in your own house instead of wasting 60 bucks on stuff you might have.

The article we used: Desktop Foundry (Again however, it was pretty confusing)